Tag Archives: craft

I can paint!

I’m still alive in case anyone was wondering. When I said I was going to write a blog post, my husband sarcastically said “Oh, you still do that?” He’s a funny guy.

A few months ago my friend, Melissa, sent me a picture of her guest room bedding and asked if I could paint her something to coordinate with it. Of course I could. I can paint!inspirationI finally got started on it and went to town. I’ll be honest, it changed a few times. I was just going to replicate the bedding, then I decided against that. I made a trip to one of my favorite stores, Hob Lob and picked up the supplies. Some craft paint, brushes and a canvas .. or 3 like I did.

setting up

You can see some polka dots that I painted over because I didn’t like them. And I just noticed the below picture is upside down. Awesome. From this point, you’ll be able to see the changes I made as I was painting.
duringAt the last minute I grabbed some burlap and buttons. Also, around the edges of the canvas I finished it with burlap ribbon. I did 3 canvases because I thought it would look cool. I hope when she hangs them, she spreads them out a little.
done

I’m hoping to get a quick project done to show y’all. I have an itch to decorate above my couch and this little project I’m thinking of will go perfectly with what I have in mind.

tarahsig

Pinterest Party – April edition

I’m sure we all have a Pinterest Party hangover …or better yet, a craft hangover. That’s a thing, you know? Much like Whitney’s new term she coined “#craftworldproblems”. And yes, before you ask, we DO find ourselves very entertaining.

Facebook fans – you should recognize this picture of the Pinterest Party – April edition sneak peek!

Pinterest Party Collage | RCHOTX

We made the trip down to Heather/Whitney’s aunt’s house again. It’s just such a pretty house and we can all spread out. In all honesty, I wasn’t sure if I was going to go, but alas, my husband was able to “make it happen”. I brought some half-started projects, 2 projects to start and then 2 little baskets to paint. Whitney has a whole nursery to decorate and Heather is a our Silhouette bitc…. I mean, worker. She didn’t really have a list of crafts after she just came off of a big week of meetings for work out of town. She did make everyone some really cute name plaques after she went outside to the “scraps pile” from the house remodel that was going on.

Front door wreathsThese two beauties were made by Paige and Ashley.

Paige was having her sweet fiancé paint their front door black this weekend while she was gone. She knew she was going to be returning with a yellow wreath so the door color needed to showcase. Heather showed her how to make the cute little fabric flowers, then we helped her with the idea of stringing “HELLO” across the center. Its just too cute!

Ashley’s wreath is the oval shape. HobLob has these cool oval shapes, in case you want one. This wreath has a super sweet story behind it. Those little rosettes down the side? Paige made those for Ashley’s wedding last year for her table number frames. Ashley spent Saturday morning ripping them off the frames so she could continue to use them in her house on the wreath. Add on that green burlap ribbon and she has a winner!

Maison Blanche Wrought Iron

Remember that field trip to Maison Blanche Paint Company? This is Heather’s take home door. It was painted with wrought iron, then Aunt Toni took the silver leaf to it. (Note – AT is a fan of this silver leaf. This is the second time she has used it and it gets EVERY.WHERE) The leaves were there glacaged part of the piece. I think it’s beautiful, even if it is that pesky silver leaf.

LAKE SIDE

SPEAKING of silver leaf – Aunt Toni’s project. These letters are the cardboard/chipboard material that you can get at HobLob and JoAnn Fabric. She used some Maison Blanche Robin’s Egg to paint the letters, then took the silver leaf to them, followed by some Maison Blanche dark brown wax. If you look closely, you can see the Robin’s Egg color peeking through. Also, note the little “specks” in front of the letters. It’s glitter’s ugly cousin – silver leaf. Its floats in the air and gets every thing it touches.

Recycled can

Paige recycled a can that Aunt Toni had saved. She painted the can Annie Sloan’s Old White, added some ribbon then added this really cute fabric flower. Very simple!

Addicting fabric flowers

ANNNNNND these fabric flowers. Oh these fabric flowers. They became “the craft” that everyone had to do (like these). Well, everyone but me, you know because they’re made of fabric and I don’t “do” fabric. Anyhow, I watched these little flowers become a quick addiction for them. As you can see there was quite a few made, and that’s not counting the ones on Paige’s wreath and can, or the ones on the “name” plaques that Heather made us all (you can see those in the very first picture collage).

2013-04-21 12.19.45

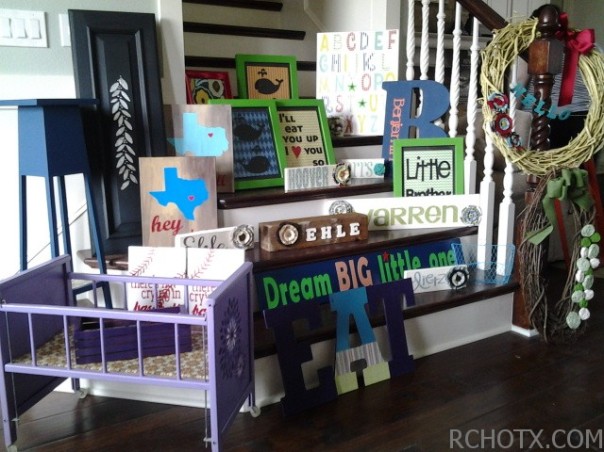
Stay tuned for the Pinterest Party recipe post and Whitney will be showcasing all of the nursery goodies she made. Baby Benjamin is most definitely going to sleep in a super cute room!

Any thing you see in the collage you want to see more of? Let us know!

tarahsig

DIY wedding invitation design

I spent the most of January through March helping plan my BFF’s wedding. Remember that pallet project? Well, we did a whole lot more.

Lindsay, the BFF, admits to not being crafty. I can attest that she is good at a lot of things, and crafts are most definitely not her “thing”. When we sat down on the Saturday before her wedding, I worked on a few projects. She sat, cut fabric squares for her guestbook project and her hair piece for hours.

Before all that, we had to decide on herDIY wedding invitation design. I told her I’d design them and we could make them for much cheaper than buying them. We did a 3 piece set – the invitation, RSVP card and map card.

Invitations to make | RCHOTXShe found a design that she liked, but we altered it. Her “theme” (if that’s what we call it) was burlap and lace with purple. I had this awesome idea to take lace and use it as a stencil on the back layer of the invite. I should have taken a picture of that FAIL. It was awful.

1st layer of invitations | RCHOTX

THIS is the layer that was to have the stenciled on lace. It was a great idea …in my head.

Wedding invitations | RCHOTXThe design of the typography 

Final invitation | RCHOTX

I think they turned out quite nice. We found some 1″ burlap ribbon online at Save on Crafts, the purple ribbon and paper came from HobLob when it was on sale, of course. Everyone knows that you NEVER pay full price at HobLob.

Invitation set | RCHOTX

The complete set

This wedding was most definitely a huge DIY project. I have a few more projects to share from the wedding. Also, here’s a few projects around the house I’m about to get started on as well. Now that it’s FINALLY spring in Texas, it’s more comfortable to go outside. So some painting can be done. I don’t paint in the house unlike other people *coughWHITNEYHEATHERcough* I’m far too messy for that.

tarahsig

Pin there. Done that. {1 + 1}

Y’all, Pin there. Done that. is BACK this week! I don’t remember why I didn’t do it last week. My house has been full of sick people, me included. I think we’ve all bounced back. There’s a pretty ugly stomach bug going around. I would avoid it if you can.

I decided to combine two pins that I’ve pinned in the past.

Source: copious.com via Tarah on Pinterest


Obviously I didn’t use the state of California, because who would want to use that? I’m totally kidding, if you WANT use a shape of California, go for it. Bless your heart. 😉 I recently found on my Cricut SCAL program that it has the shapes of the states. I was so excited, I knew exactly what I was going to do with the state of Texas.

Paint and foil | RCHOTX Canvas and paint | RCHOTX Papers | RCHOTX

SUPPLIES:

  • canvas
  • 2 shades of brown paint
  • cardstock
  • heart shape from a previous project
  • Cricut
  • modge podge

I painted the canvas to start. While the canvas dried I went through the tedious process of finding the “right” cardstock. Since I knew where I was going to put this project, it was easier to pick out my paper. Then I put my Cricut to work.

Cricut working | RCHOTXTHIS is what it looks like for this bad boy to work. 

I really thought the shape of the Texas would take a lot longer. I loaded the paper, hit CUT on the program and went to work on something else. I didn’t even get situated in my chair and the box saying the cutting was done came up and the Cricut had stopped. I was impressed by that! Next was the job of finding the perfect font that looks similar to the one in the pin. It didn’t have to be, but I liked the BOLDNESS of the font.

My pile of letters | RCHOTX

Letters cut and ready to start but … 

HELLA | RCHOTX

not before I do something inappropriate with the letters. 

Hey Y'all | RCHOTX

Yeah, I know the modge podge is still wet. Instead of doing it in my craft room, I ran into the living room to catch an episode of my “favorite” show, House Hunters (and maybe an episode of Moonshiners). I did the letters a tad too big, but I’m okay with that. I managed to work with it. I’m sure if Heather had made it, her heart would be south for Austin.

What do y’all think?? Did I pull off combining the two pins?

Total time from start to finish – about 35 minutes

Shared at My Repurposed Life

Happy Hour Projects
504 MainThe Shabby NestWeekend Bloggy ReadingHookingupwithHoH

The Humble Brag Link Party


DIY Show Off

tarahsig

Valentine’s Day {Printables}

As many of y’all know, Heather is a lover of all things printable. Well, okay, GOOD printables, not the “I did this on MS PAINT! Isn’t it BEAUTIFUL?” I’m sure there’s not even a MS Paint anymore. Did I just date myself? Anyhow, we decided we’d eventually start doing printable items once we got going steady on the blog. Guess what? You’re in luck. We’ve gotten going and we’re giving you some FREE printables to decorate for Valentine’s Day.

When we were discussing what exactly we were going to do, we just tossed around a few ideas. “Oh let’s do some cutesy love quotes”, “Oh song lyrics would be fun” or “Let’s do an anti-Valentine one!” When we got together last Monday for a little craftiness, we discussed our printables further. Its either really scary when the 2 of us are together brainstorming ….or its completely genius. I’m going with absolutely, fantastically GENIUS this time. And once this idea came about, we giggled and laughed. A LOT. In fact, even as I type this I’m giggling and giddy over it.

Without further ado ….

The Beatles | RCHOTX New Kids on the Block | RCHOTXN'Snyc | RCHOTX

Backstreet Boys | RCHOTX

One Direction | RCHOTX

And?

Go ahead. Admit it. You LOVE them, secretly or NOT so secretly. You ABSOLUTELY love them. We couldn’t help ourselves. We started talking about The Beatles song since Heather used that for her LOVE frame, a New Kids on the Block song came on in the moment and BAM! We came up with Boy Band Printables. You’re welcome. 🙂

The Beatles Printable | RCHOTX
{fonts: American Typewriter and Great Vibes}

NKOTB Printable | RCHOTX
{font: Allura and Bernard MT Condensed}

N’Sync Printable | RCHOTX
{font: Champagne&Limousines and Dynalight}

Backstreet Boys Printable | RCHOTX
{font: Bebas and Coneria Script Demo}

One Direction Printable | RCHOTX
{font: Simply Glamorous and Book Antiqua}

Just click each link and it will take you to the printable without our watermark on it. I left a box around it to use as a guide to cut and fit in a 8×10 frame. And again, you’re welcome.

I’m linking up with twelveOeight‘s Pretty Things Linky Party!


Lil'Luna


Happy Hour Projects

tarahsig

Pin there. Done that. {A wreath}

We’re prepping you for Valentine’s Day. NO holiday should be left behind … even if it is a “Hallmark holiday”. I’ve actually put up the few Valentine’s decorations that I have. And sadly, it’s the Lots of hearts frame and LOVE garland that I’ve made this week and this wreath. How depressing.

As always, you should always have a wreath for your front door. I’m not normally a big fan of hearts, but for this wreath I did hearts. I happen to have this red/pink tie-dyesque yarn handy, and I always have wreath forms handy!

Valentine wreath | RCHOTX

As a serious crafter, you should always keep extra supplies handy. I’m sure I have enough “extras” for at least 3 more people (Hush, Heather!) I happen to have some Valentine color options of felt to make these super cute flowers and throw some hearts on there. Its so simple!

tarahsig


Hearts. LOTS of hearts. {Worth It Wednesday}

What makes a Valentine’s Day craft post really “Worth It”? Pay attention closely.

Worth It = Purchasing a Silhouette or Cricut for craft projects

Look at the first picture.

Done?

Exactly. My point is proven.

Monday became a craft/blog ideas time for Heather and I while she had some time off from work. We accomplished 1 1/2 crafts. We started the first one last Thursday night, then started the second one. We both found a cute Valentine project on Pinterest (I know, shocker!) from tatortots & jello. She asked if I wanted to do one with her, and who am I to turn down a craft project. She was nice enough to go ahead and cut out all the hearts we needed with her Silhouette. She’s nice like that. She definitely our “project cutter outter” (yeah, I totally made that word up).

HeartsThis is just the PINK hearts. 

frame supplies

SUPPLIES NEEDED:

Cardstock/scrapbook paper (solid or patterns, personal preference)
1 sheet of 12×12 heavy cardstock (we chose glitter paper, it is much heavier)
Pop dots
Frame (we used 12 1/2″ x 12 1/2″)
Cricut/Silhouette if you don’t want to cut millions of hearts out by hand

**we’re skipping the step-by-step because seriously, it’s THAT simple**

Be MY Valentine

Heather, Miss Fancy Pants, decided to make hers way more 3D. She folded each and every one of those hearts in half so they look like they’re flying off her page. (I’m sure they were scared of ALL THE GLITTER!) Heather was over the hearts about halfway through. She did a pattern with the colors and some of the colors were very similar to each other. I’m blaming that on why she was over it. I think it turned out super cute!

Be My Valentine - details

A close-up of the “flying” hearts

LOVE

I, on the other hand, didn’t bother with a pattern for the colors. I just went with the flow. I also didn’t bother with measuring everything so my lines are a little crooked. Its mine. I don’t care. I’m not a big Valentine’s Day decorator, but I’ll be putting this up and a few other things.

We’ve got a few more Valentine’s Day projects up our little sleeves just for y’all. Well, for us too, because let’s be honest. We do most of this stuff for ourselves to share with you.

The Humble Brag Link Party

tarahsig

LOVE garland – Pick Your Plum

I have a little “problem” with Pick Your Plum. (By the way, they are one of our affiliates, so click that button on the right to buy from them! So simple!) They MAKE me buy stuff. They force it on me! Okay, not really. But they do send me a tempting email every day, and I buy quite a bit from them.

So quite a while back I bought some wooden plaques – I’m guessing they are lightweight MDF – and loved them. I always said that when I saw them again I was stocking up! Well, guess what? Pick Your Plum offered them again and I jumped on it. I jumped on it so quickly that I didn’t even read the measurements! Imagine my surprise when I opened the package and they were teeny tiny – like 2″ x 3″ tiny. I was mad at myself and just put them away; I knew that something would come to me and I would use them eventually.

pick your plum blank plaques | RCHOTX

It came to me the other night when I had Tarah and Christie over for an impromptu crafting session – Valentine’s Day garland! I went ahead and cut out some letters so we could have more time to gossip drink craft.

First, we covered each plaque with Valentine-y paper and Mod Podge. We filed the edges with a nail file instead of cutting it to the size of the plaque, because that never works well for me.

purple plaques | RCHOTX

Then, I ran the letters through my Xyron machine (love that thing) so we just stuck them on the plaques. Another couple of coats of Mod Podge and we were almost finished!

Unfortunately, I have a crappy hand-me-down drill that doesn’t hold a charge well. We let it charge, and then realized that my husband had taken my drill bits to work with him. What?! So that was all we could do for the night.

Fast forward to today – I went to Tarah’s house and we used her Crop-A-Dile to punch holes in these things with. We strung them with some twine (ALSO purchased from Pick Your PlumI TOLD YOU I HAD A PROBLEM), and they are too cute! Heck, you could even wear it as a necklace.

LOVE necklace please do not do this | RCHOTX

Okay, seriously. Don’t do that. If I ever saw someone wearing that, I would have to point and laugh. Just no.

Aren’t they cute?LOVE garlands

LOVE - details | RCHOTX

Pick Your Plum has a really cute deal coming up tomorrow for Valentine’s Day. I’ve used this stuff before, and it is an easy way to decorate something quickly and mess-free. Washi tape has become so popular lately! I can’t believe that Pick Your Plum has Valentine’s Day themed washi tape. You guys better pick that up quickly, because it WILL sell out.

I mean, think of all the stuff you could do with this!

DSC_0145_zps5915cb75copy_zps7fa0cb6b DSC_0131_zps97d3f55dcopy_zps441770d5 DSC_0034_zpsecce9b46copy_zpsb1fc428b


Get it before it is all gone!

heathersig

Pin there. Done that. {Kids craft}

I know! I know! There wasn’t a Pin there. post last week. Were you sad?? You better say yes.

This week’s is Christmas + craft + kids = Mommy might need a drink. 🙂

Santa face pre-assembly | RCHOTX

You need ….

paper plates
cotton balls (Hello, Dollar Tree!)
red construction paper
glue
scissors

I saw this neat craft and figured it would be SUPER easy for a 3 year old and 1 year old to do, along with an almost 5 year old. I was right. The key though, have every thing ready to go. I cut everything out.

IMG_3080

I cut the center out of the paper plates and attached the cute little Santa hats I cut with the red construction paper.

IMG_3081

This is clearly my OCD child. Every cotton ball is perfectly lined up and he nearly freaked out when I suggested adding a second row on the bottom.

IMG_3082

Then there’s this one. Oh, this child. He just threw the cotton balls on there with no rhyme or reason. My kind of a dude … sometimes. He DID allow the suggest of a second row to make the beard thicker.

IMG_3083

And finally, her. I had her in my lap so I could help. Yeah, I put a ball down, she took it off. I put another down, she took 2 off. FUN times!

IMG_3084Yes, those are my kids in shorts … on December 19th. The shorts/t-shirt combo scream Santa Claus completely, don’t you agree? Obviously, Little Miss thinks it is a fancy pearl necklace. I’ll just let her keep thinking that.
tarahsig

Pin there. Done that.

Y’all remember the painted plastic balls from last week? Yeah, those pesky things. They didn’t make it. I pulled them up today (4 of 6 of them, because 2 blew away), and they were STILL not dry. I’m not kidding.

This week’s Pin there. I just pinned 13 days ago. There were two versions I had to decide between. While the other one says “May your Christmas be merry and bright”, which is a little saying I’ve fallen in love with. However, I went with the one below for the more rustic feel and my husband loved the quote.


During the summer, I made the rounds around our neighborhood that still has new houses being built. I went on a pallet hunt. I found 3 decent ones at one house that had just been shingled. SCORE! They sat in the garage and Jody decided to break them down and picked out the best pieces. I showed him the above pin and he loved it. Loved it so much that he helped. He cut the pieces for me. I’ll admit, I’m a little leery of power tools. I’m kinda clumsy and I’m deathly afraid of cutting myself … or deathly afraid of pain, I’ve decided. The first step is admitting it right?

Nice and rustic, don’t you think?? We (meaning Jody) cut the 1×4’s into 7 pieces. The back piece is 24″, then the others are 4″-14″. Also, I found that using our trash can as a table is AWESOME. See the blue paint, I’ve clearly made it multifunctional. No one can say I’m not resourceful.

Sooooo, when we went to screw in the top pieces (and when I say “we”, I really mean we), each one split. After about 20 minutes of trying to get the wood glue to come out of the bottle (totally not kidding!), we got some wood glue! I’m a total over gluer. I had it dripping over. And then I needed something heavy. Enter a can of paint.

I made my own stencil with my Cricut. I’m pretty awesome, don’t you think?!? Go ahead .. “yes you are Tarah.” I had a nifty little can of white Valspar paint. I have no idea where I got it at, but it came in handy!

And … we’re done! I absolutely LOVE it!

AND … someone else *coughHEATHERcough* loved it too. I made her one as well.

I think y’all should know my dedication to doing this. I sat in my living room working on these while I watched on of my new favorite shows, Duck Dynasty. If you haven’t caught an episode or even heard about it, you’re totally missing out. Yeah, sure it’s about a family of bearded men and their duck call business. But … they are hilarious. HILARIOUS, I tell ya!

Are y’all ready for a giveaway? I know you all just said “YES!” You’re in luck! We’re going to have a quick little giveaway from BeeSilk Naturals. I’ll have more info for you soon!